|
|
Rotary table bracket for the Soba 4" table Last updated: 05 Dec 2016 |
Now complete, a bracket to mount the Soba 4" table in the vertical plane. This will be cast out of aluminium with webs approx 20mm thick (3/4"). There will also be a matching tailstock to suit the new centre height of 73.0mm (2 7/8").
Why bother making a bracket if the table has vertical mounting points anyway? Look closer at the picture below and you will see that the handle points upwards when the vertical mounting is used, hitting the milling head.
Vertical bracket |
|
 |
27-Dec-2002: It also overhangs the
milling table making it
difficult to get a firm fixing. The makeshift clamping arrangement
and Jacobs chuck to get extra clearance won't win any safety awards...
Lack of tailstock means shaky workpiece. A couple of minutes before this picture was taken, the slitting saw dug in and stripped the gears on the mill. |
 |
Click the link on the left for a drawing in Acrobat PDF format for the rotary table bracket (updated 29/12/2002). |
 |
03-Jan-2003: Click on the picture to see details of how the casting was made. |
 |
09-Jan-2003: I tried about 4 castings, this one looks OK so it is being faced in the lathe as it's a little too tall to fit in the mini mill. |
 |
11-Jan-2003: Painted in corporate colours, it now sits on the milling table solid as a rock. I was worried that 3/4" thick cast aluminium would not be strong enough, but it's just fine. |
 |
At least now the control is on the front rather than hitting the milling
head on the top.
The locking screw is also easier to get to. |
|
|
 |
28-Dec-2002: Not much to report at this time, just a couple of drawings for the tailstock stand bracket (updated 29/12/2002)... |
 |
...and the ram plate. |
 |
31-Dec-2002: No casting today due to bad weather. Time to make up a
pressure screw for the tailstock ram.
The drawing calls for an M10 thread to which has been added a small wheel made out of HE30 and a speed handle made from steel and black oxide coated. |
 |
11-Jan-2003: Finally got round to making the casting for the ram. Click here or on the pic for more details. |
 |
13-Jan-2003: The ram body is now complete and painted sitting on a couple of SKF bearings to chock it up. Just need a small bracket now and the hardened ram itself. |
 |
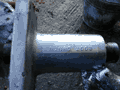
19-Jan-2003: The hardened steel ram has now been turned to size. Only the end has been hardened and polished. One more part to go (the tailstock bracket), and the job is done. |
 |
1-Mar-2003: Job done. The bracket has not received any paint, and will probably get left like that. It's a rough looking piece of kit, but at least it has achieved its objective of providing support for the parts being machined. |
These pages are maintained by Duncan
Munro. All content on this site is Copyright ©2002-2026 Duncan
Amplification.
Warning: These pages consist of images and descriptions of equipment
which can reach high temperatures creating hazardous and potentially dangerous
situations. These pages should not be taken as a step by step guide on how
to construct any items or carry out any particular procedure, nor should any
references to safety contained herein be taken to guarantee safety in all
situations.